Tools & Workflows for Running a Large Scale Content Production
A write-up of our presentation at the Project Management Meetup in Berlin
This article is based on a talk Nico gave at the Project Management Meetup Berlin on 26 November, 2019. You can find the slides here.
In this article we share the internal team setup, with a focus on the tools and workflows we used for running a content production project which lasted almost two years.
We will cover:
- Our internal team setup for communication
- Our core workflow and tool setup (coordination)
- How we prepared for future growth
- How we streamlined communications with the client team
Project Overview
We were hired to consult on creating high-quality medical and health related content to attract visitors via organic search to the client’s website. The content needed to be very well researched and sourced, and was to be reviewed by a team of medical professionals on the client’s side, meaning there was a QA workflow to be managed between the two teams.
On our end, we worked with a team of professional writers and editors, all native English speakers, living outside of Germany and in different time zones. With that our team setup was fully remote.
Internal Team Setup
1.0
We needed a setup that would allow us to communicate efficiently and primarily asynchronously, so that we could stay highly coordinated. Ensuring maximum flexibility for each individual’s work schedule and keeping interruption to a minimum was a second important consideration.
Task Manager Is the Main Communication Channel
Our most important communication channel for this project was the shared task manager – in this case Asana.
We will get into the details of the Asana setup in section 2. We also used email and team chat.
Email for Announcements and Memos
As specified in our team’s ”communication channel conventions and response times”, a one-pager which is part of our handbook, we used emails mostly for announcements or memos to the team, or parts of the team.
Email correspondence with the client team was kept to not more than a few emails per week, often less. A change in the workflow and its correlating documentation would be a good example for something we would share across the team via email.
Team Chat for Asynchronous Conversations
We used team chat for the bulk of our conversations. One thing to point out here is how we created and used Short-Lived Topic Channels apart from the regular direct messages and ongoing rooms or channels you are likely familiar with. The idea here is to consciously create a dedicated and temporary channel with the purpose of resolving an issue or finding a solution to a particular problem. Then close (and archive) the channel once that has been accomplished.

After creating the channel and laying out the problem and circumstances, we only invited the team members that needed to be part of that particular conversation. Later, the ensuing result needs to be transferred to the project’s documentation and shared with the rest of the team – and respectively the client team.
Core Workflows
2.0
Our editorial workflows are represented in Asana, using Kanban-style boards, with a linear flow of columns from left to right.
We represent each topic by a task (card). All work related to that topic is tracked in subtasks. This combination allows us to have an uncluttered overview layer of the boards, showing
- what (topic) is being worked on,
- by whom (assignee), and
- where this topic currently is (column) in our production flow.
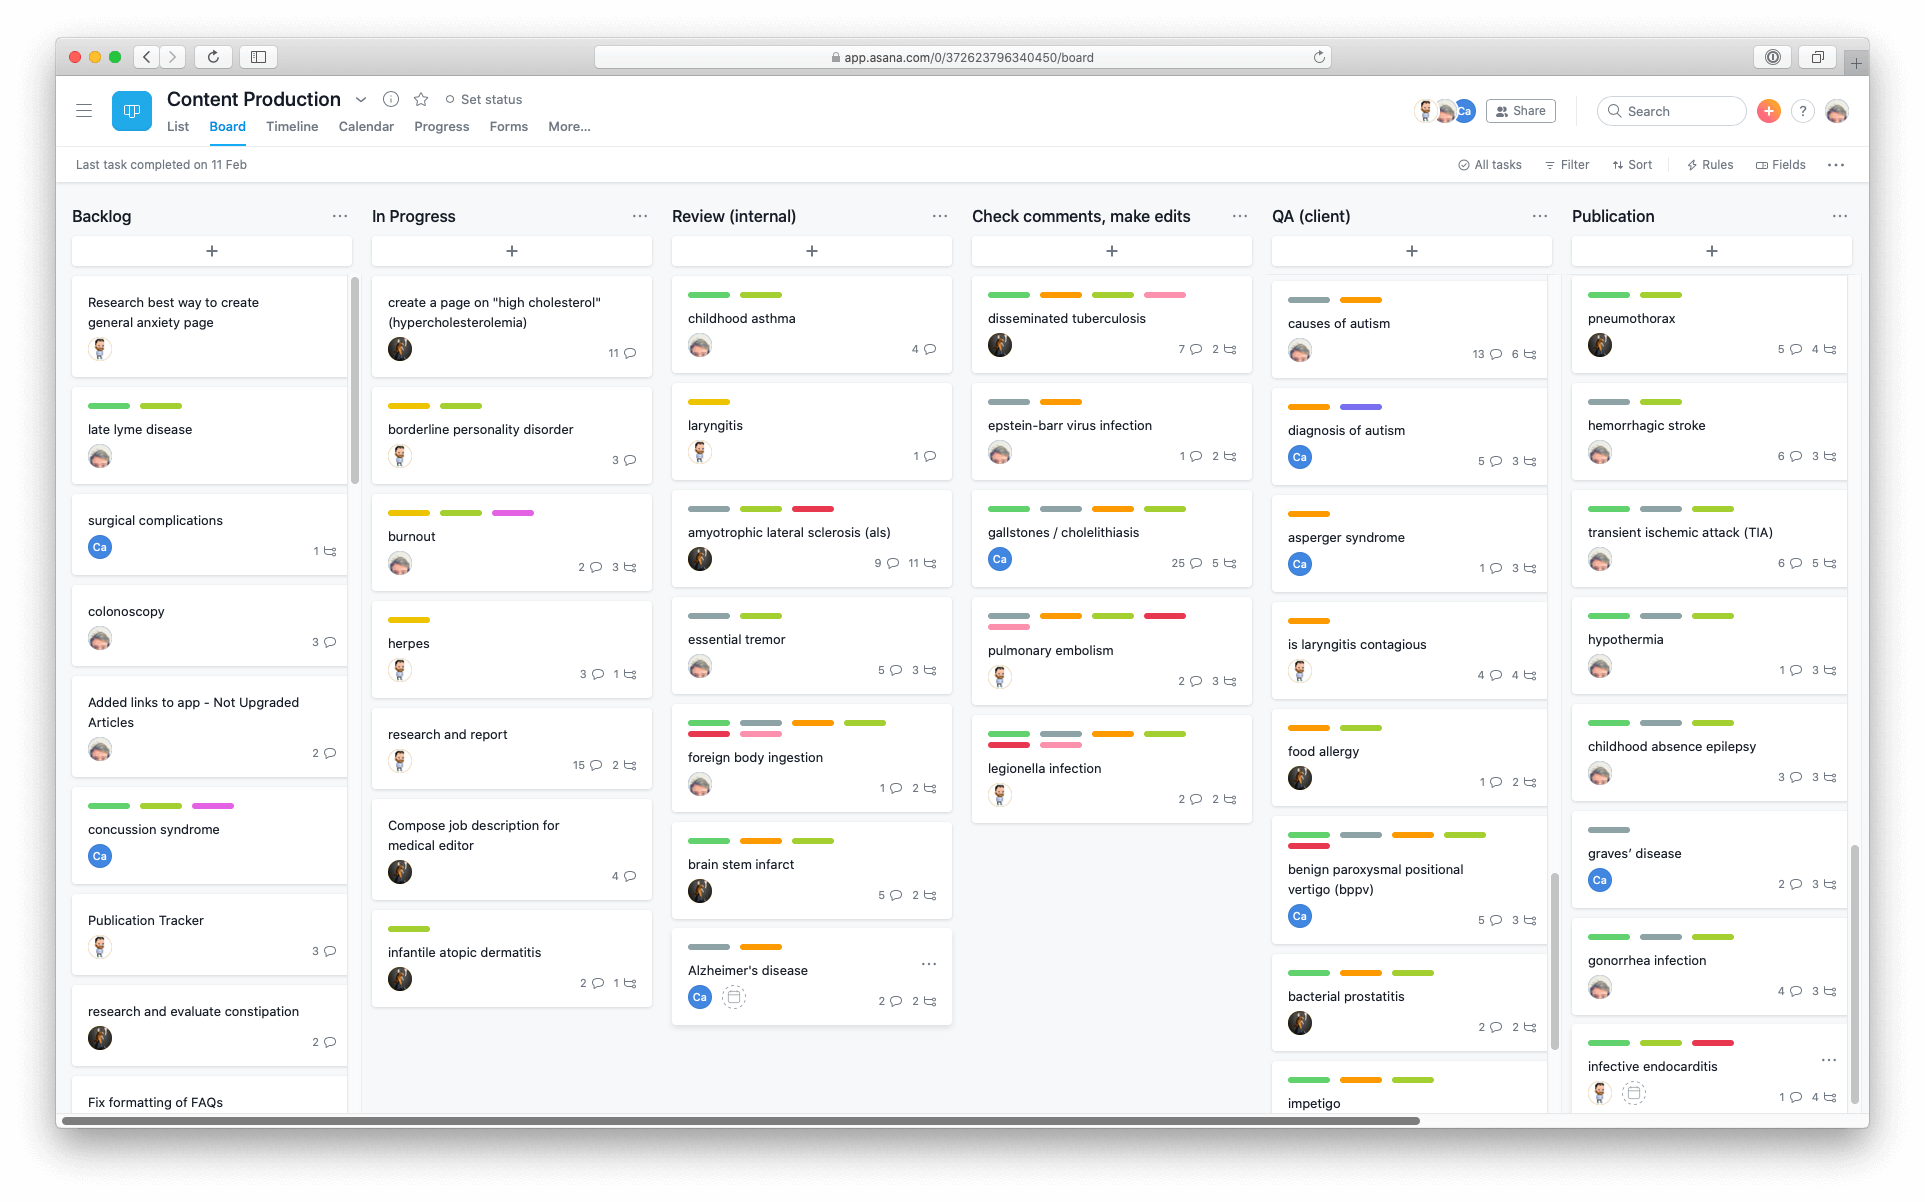
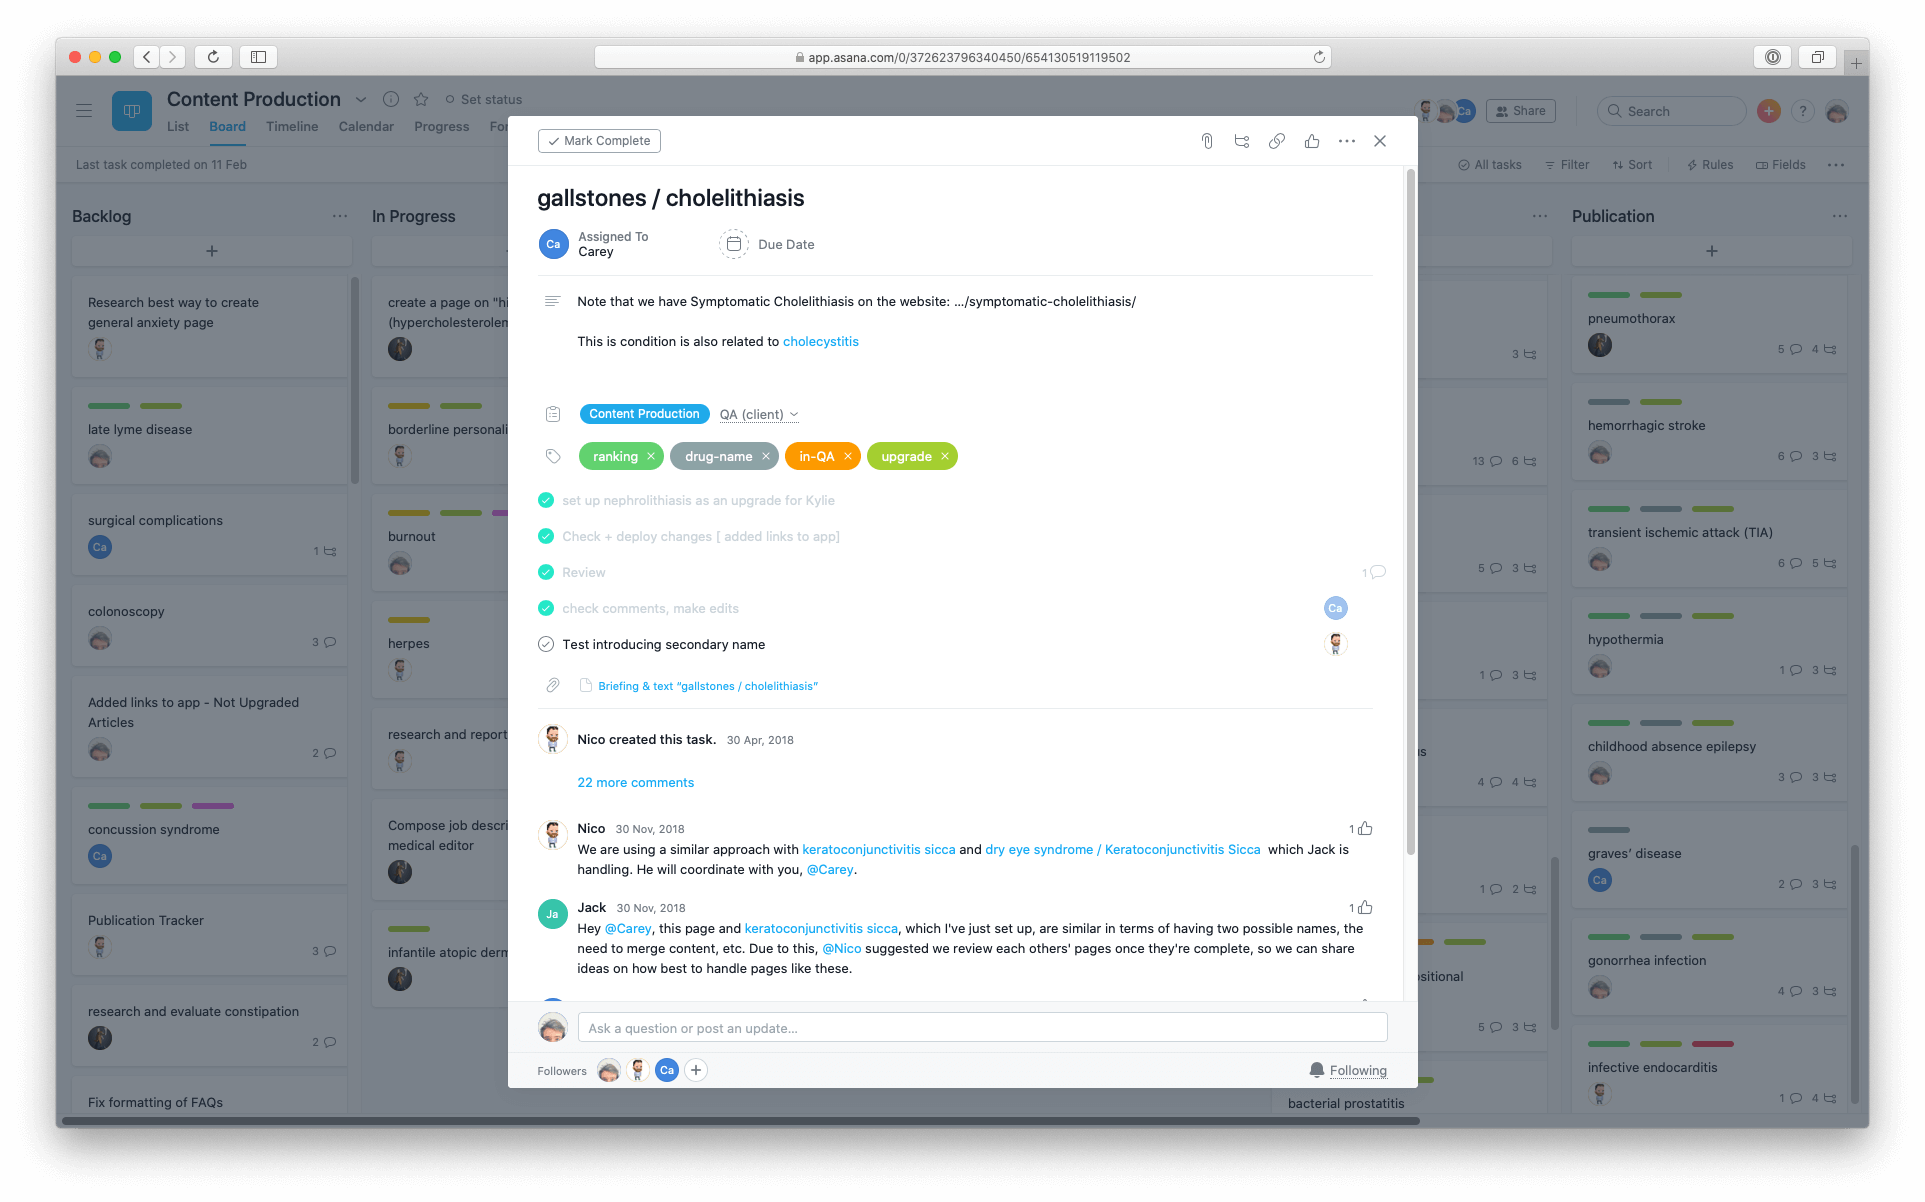
All Details on a Second Layer
All communication regarding this topic is captured in the comments. If we happened to have a conversation elsewhere, say team chat, we did habitually document the decisions via a comment with a succint summary.
We also kept any and all related resources of each topic attached and/or linked to from the task. The main task in Asana thereby becomes an access point from which everything is merely one click away.
Over time, Asana automatically creates a full record and timeline, informing the team about who created a task, when, which questions were asked and answered, relationships between topics, and so on. With hundreds of topics to manage, this becomes more and more handy whenever you need to refresh your memory or investigate something.
Additionally, we used tags to keep track of features and states which were column-independent. An example tag would be “cta”, used to signal whether links to the client’s mobile app had been added yet.
As a result of this setup, the workflow represented by and managed with the tool, the entire team is kept in the loop about what’s happening, can see what to work on next, and access any details on a second layer, the subtasks, attachments and comments, without the need interrupt others.
Tight Information Flow
We refer to the way information moves and/or is actively being moved within the team as Information Flow Design. With the setup described above, the tool (Asana) is creating notifications for any changes to the topics, as well as comments made and tags added. Complementing this with the practice of reading and processing your Asana inbox each workday, the result is a tight Information Flow:
If you are responsible for a given topic/task, or one of its followers, you will always be in the know about what’s added, moved, or changed. Everything is accounted for and no information is lost.
With this Information Flow in place and working reliably, we had no need for regular status meetings, and also avoided any all-team meetings.
Preparing for Growth
3.0
Since we expected the team to being growing over time, we prepared for a smooth onboarding of new team members. With our internal team setup and the core workflows in place, the next layer is documentation.
Documentation may not be sexy per se, but it can be if it’s good, useful, and short. Always be documenting.
Documenting
We had excellent results with a combination of written documentation and correlating screencasts. A video walkthrough or tutorial is especially helpful and accessible for an initial overview. It allows the creator to share the thought and decision making process while demonstrating the steps of the work at hand. Additionally, the recipient can pause and scrub within a video recording as necessary.
As a rule of thumb, screencasts should best be kept to a few minutes in length. If there is more to explain, break it up into logical parts and make sure to use consistent naming conventions. Always create written documentation to go along with it. Text is more transparent, easier to skim, and can be updated in parts. Keeping the documenation well interlinked makes related details or related information available, moves them but out of the way.
Onboarding
For every new addition to the team, we wanted to make sure to reduce the friction and avoid information overload. Having someone read many pages of documentation and learn the entire project setup right at the start can be very tedious and feel too theoretical. With a content production like this each new hire should be able to start immediately with what they already know and do well: writing.
Every new hire was coached by a senior team member during onboarding. Our existing team selected and prepared three reference topics, plus a briefing to create a new topic, supported with tutorials that explained the basic process. This allowed the new hire to enter the project very naturally, picking and moving their first topic from Backlog to the In Progress column on our board. With their topic progressing, they learned the layout of the project step by step.
We had intentionally decided that the team would review each other’s work, meaning every writer also acted as an editor. The intention was to receive and also give feedback, so as to learn and pick up good ideas or approaches, and to develop and establish an increasingly coherent, unified tone and style.
Receiving feedback and implementing it is one thing; being put in a position where you have to express what you approve of and what you would change, or do differently, and why, goes much deeper. This also created a sense of equality which the team appreciated.
Improve With Feedback
With each new addition to the team, we had the opportunity to ask how well and clear the documentation and its explanations were received. If the new hire found anything missing, ambiguous, hard to understand or simply unclear, we made an effort to update and improve our material.
Client Interactions
4.0
When managing a project where you need to inform or coordinate with other people, teams, or departments, no matter whether that is an actual client or another part of your own company or organization, there are challenges in how to inform and interact with those outside of the project’s core team.
As laid out in the previous sections, our internal Information Flow was working well. As for interactions beyond the team, difficulties can arise because it becomes harder or unfeasable to ensure that the same communication conventions or tools are being used. To retain some control while minimizing friction (and potential resistance) on the client’s end, we designed and used workflow-tool-combinations which allowed both sides to use their own, established set of tools.
How Can We Share the State of Production With the Client?
With a shared task manager, such as Asana, you can typically invite guests to your organization or project. From the Asana documentation:
If you share a project with them; they will see that project and all tasks within that project.
Would this be a good option to communicate the production status for us? Is this what’s most useful here? We quickly decided against it, for a couple of reasons.
- The client team is not using (or used to) Asana. It would be yet another tool for them to create accounts, familiarize themselves with, and to check and manage.
- There is way too much information there, much more than is necessary or relevant. This contradicts our princinples for Information Flow Design.
- The project is our team’s private space. It can get messy. It is internal, and with that comes a certain degree of freedom to express ourselves amongst the team. Removing that could unintentionally move much more of our communication about the work to other channels, which we want to avoid. The direct connection between tasks and related communication, as pointed out in section 2.0, would become severed.
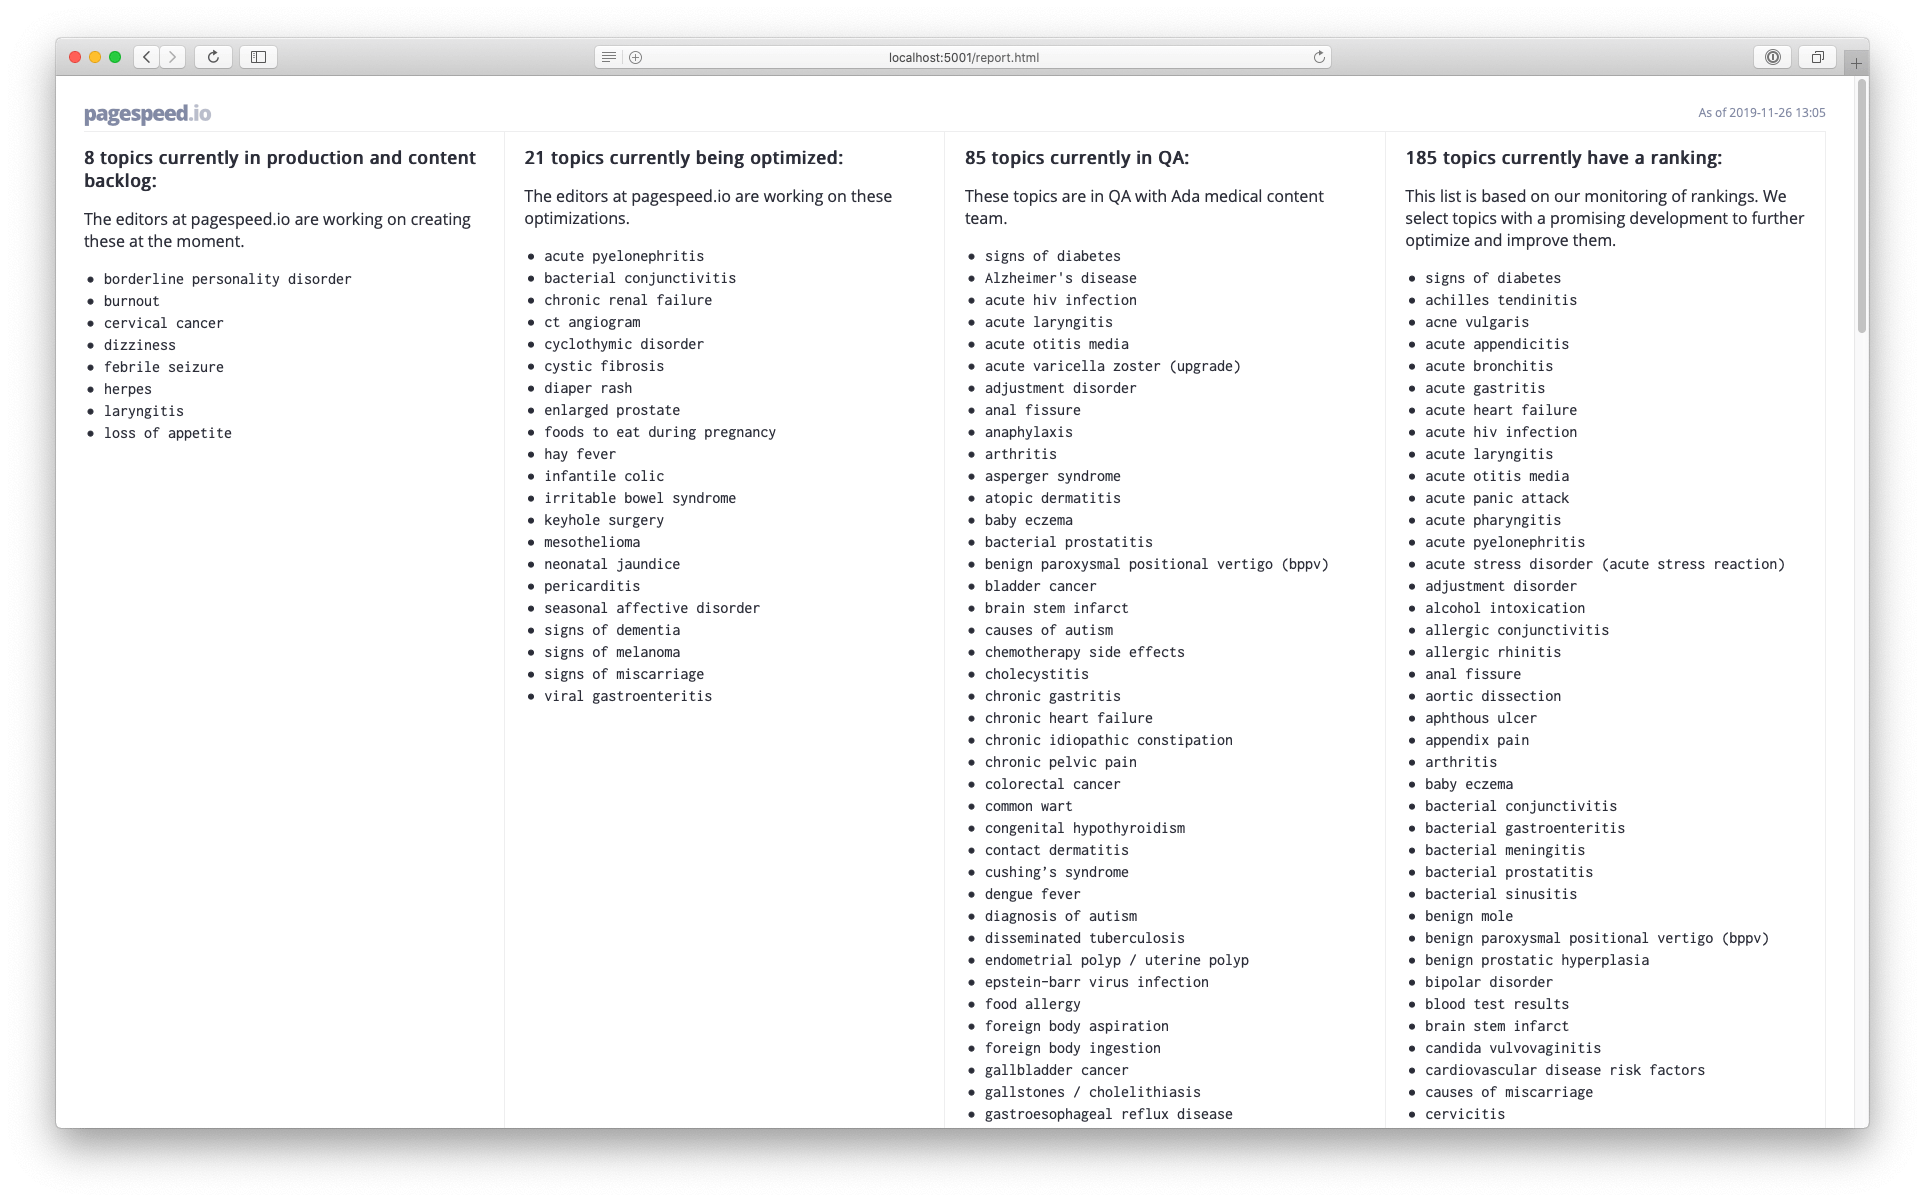
The actual questions, the information the client team was interested in, were:
- What are we currently working on (production and optimizations)?
- Which topics are already added to the backlog?
- Which topics are currently in QA?
- Which topics show signs of increasing visibility (rankings in search engine results pages)
To solve this we generated a status board with a column for each question above. It showed the titles of topics as well as how many there were. It updated itself daily, with data being pulled directly through the Asana API based on certain tags.
How Can the QA Team Notify Us About Edit Requests?
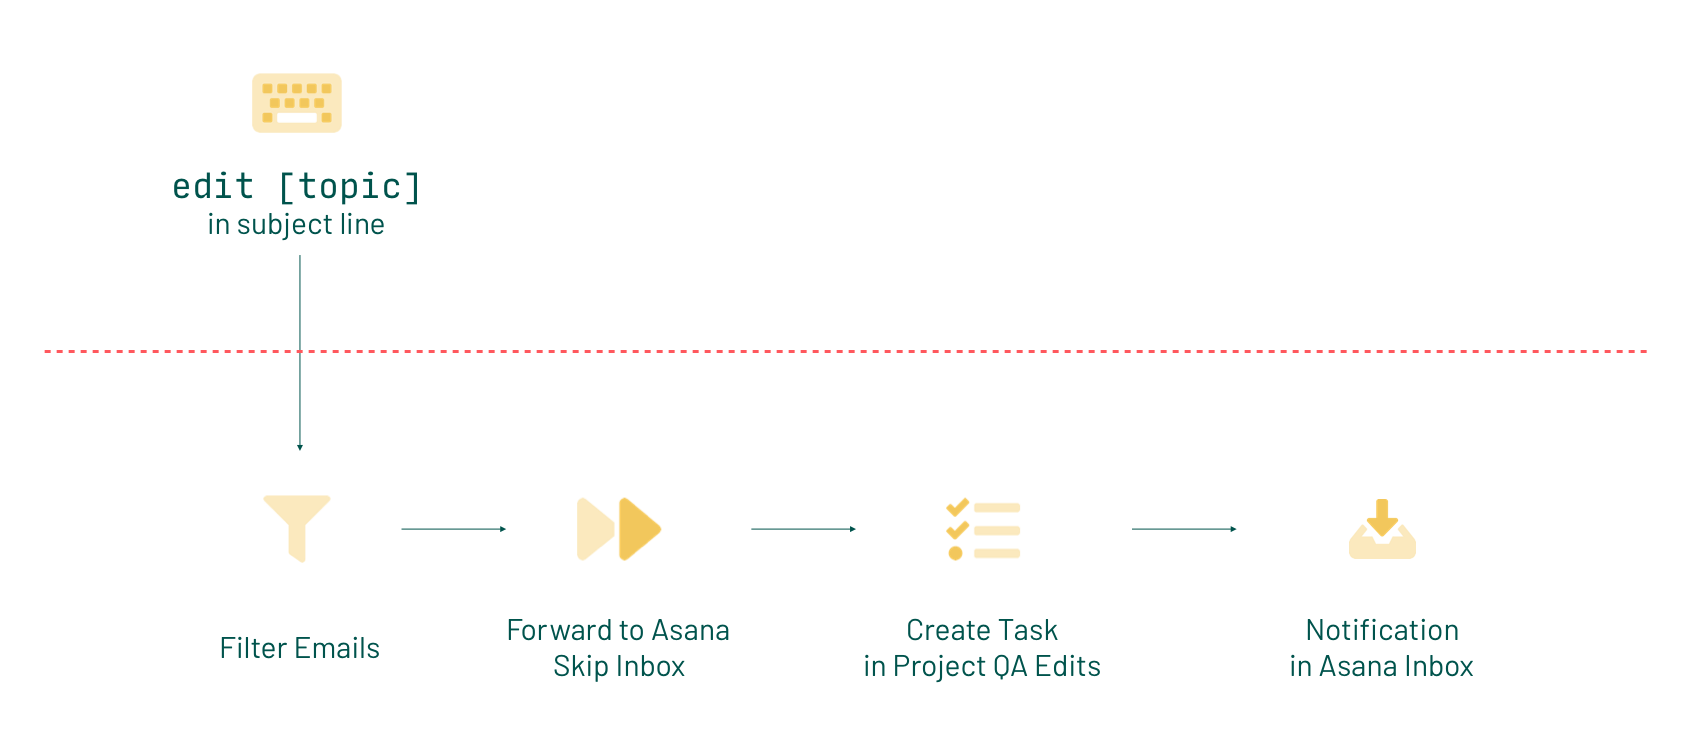
The second example of a designed workflow-and-tool combination had to solve the issue of getting our team notified about edit requests in the QA process. Ideally, the team of medical doctors reviewing our work would create tasks (or subtasks) in Asana and our writers would be informed via notifications. But again, creating accounts and learning to use another tool is quite a bit to ask from people.
We instead would have much preferred to let the client’s QA team use an existing tool, one they were already familiar with, in order to minimze friction and reduce the risk for errors or confusion. This is why we came up with the following workflow which is especially elegant insofar as it lets the “externals” use something very familiar, email, while it funnels the information correclty formatted into our system.
The documentation only needed to specify that the email subject had to include the keyword “edit”. We then filtered these incoming emails on our end, had them skip the inbox (less clutter) and forwarded them to a project email address at Asana (see here). As a result, tasks were created automatically without the need for any addtional manual work.
Failsafe: Even in the case something got mistyped, the email would bypass the filter and show up in the respective writer’s inbox. We could let the doctor know how to do it right next time.
Before You Go
All of the presented solutions are based on the princinples of our TightOps framework. You can read more about how to use this with your own team or organization at tightops.com/fundamentals.
If you have any questions or would like to learn more, please get in touch.